|
|
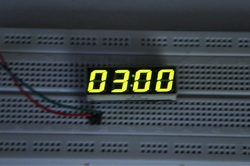
Digital 24 Hour Clock Module
with thermometer + voltmeter & super cap memory
This module is truly unique. This listing is for a digital 24 hour clock module that has a thermometer setting, and a digital voltmeter setting. There is also a super capacitor on the board that will keep memory for a short period of time after power off. It will recharge during normal powered operation. There are only two interface pins; (+), for positive power supply rail (5v to 15v MAX), and (-), for supply ground. There are two on board buttons. The video offers a full demonstration of how to use this little guy. From the front, the right most button will allow for you to change between clock mode, thermometer mode, and voltmeter mode. If you press this button again, it wil land you back in clock mode; although now the unit will scroll between all three functions with about three to four seconds in between. Let's talk about the functions, shall we?
Clock Mode:
This is the main function of the module. If you press the left most button when facing the front of the display (as seen in the video), you can switch between minutes and hours, and use the right button to set them to the time on your clock. You cannot select 12 hours mode. It is not written in the code. A full demonstration of how to set the time is in the video. If you have any questions, please do not hesitate to ask.
Thermometer Mode:
This is a neat mode. It reads out in degrees Celsius. The thermometer may not be fantastically accurate, but you can compensate for that. At the end of the video, there is a segment about how to compensate for inaccurate temperatures. The first time you power this device on, enter into thermometer mode. If the temperature reads 25 degrees, but you know for a fact that it is actually 26 degrees, you can compensate by a degree. Press the left button (When facing the display side of the module). Keep pressing it until you see something along the lines of (AC: 0). If you click the right button, you can add or subtract up to +/-5 degrees to the default thermometer readout by using the video and the following table as a guide.
AC: 0 : Leave thermometer as is.
AC: 1 : Add one degree to default thermometer value
AC: 2 : Add two degrees to default thermometer value
AC: 3 : Add three degrees to default thermometer value
AC: 4 : Add four degrees to default thermometer value
AC: 5 : Add five degrees to default thermometer value
AC:-1 : Subtract one degree from default thermometer value
AC:-2 : Subtract two degrees from default thermometer value
AC:-3 : Subtract three degrees from default thermometer value
AC:-4 : Subtract four degrees from default thermometer value
AC:-5 : Subtract five degrees from default thermometer value
Voltmeter Setting:
Not much to say about this setting. It is fairly accurate, but you need at least 6v for this function to operate properly. However, you can't put more than 15v on the supply pins, so this function is limited to 6v to 15v. Please see a demonstration of this in the above video. If you have any questions, please do not hesitate to ask!
Specifications:
Supply Voltage: 5v to 15v (Voltmeter function needs at least 6v to operate).
Max Current: <6mA
Board Length: 40mm
Max Board Width: 13mm
Max Board Height: 16mm (Pins included)