|
|
|
CURRENTLY OUT OF STOCK
Voice changer DIY Electronics Kit
Featuring the RTS0072B
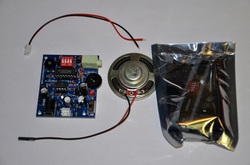
This listings is for one of our newest designs! This voice changer kit is based off of the RTS0072B IC. There is an assembly video below, and I'll be uploading new project idea videos as time progresses. This kit comes with all of the components necessary to built it into a fully functional device. It also includes an 8 ohm/1 Watt speaker that connects directly to the board, and a 9v battery connector that also connects directly to a header on the board. There is an on-board audio amplifier (LM386), and an on board microphone that is located to the left of the DIP switch. If you watch the video above, you can see me working with a modified version of this module. I've spliced on an audio connector, and I'm able to completely screw with popular songs! If you're clever, you can use the documentation listed below to modify a standard telephone so that when you speak into the microphone, the person at the other end hears a robot voice,or a voice with extremely high or extremely low pitch. We also offer this as a fully built and tested module. If you want to add on another audio amplifier to make the sound much louder, there are two pads below the speaker header that allow for you to interface this board to an additional external audio amplifier.
I've included a picture which shows you how to add audio signals from say your ipod, or other audio device. Resistor#9 (R9) can be soldered to under the board. Please look at the picture, and see the schematic diagram below. There is a variable resistor knob that allows for the user to vary the volume. There is also an additional port (green) if you want to add an extrernal microphone to your device. We added this port in because the microphone that is on the PCB is so close to the board and the speaker that you may have trouble hearing the modified voice through the speaker when you can hear yourself at the same time from so close by. If you'd like an external microphone, we can supply one for $3, but it won't come with the module. If you want one, please ask, before you pay, and I'll include it in the invoice.
There is a jumper that allows for the user to change between ROBOT voice and transposed voice. When connected, pin#7 of the RTS0072B is connected to ground. Please look at the picture enclosed to show you what options are available via the 4-switch DIP switch. You can set the tone frequency to 800Hz, 1333Hz, 660Hz, and 2kHz via the first two switches, which are connected to pin#3 and pin#4 respecively. Pin#3 is the S1 pin, and pin#4 is S2. Please see the enclosed table in the picture, and/or the data sheet that is linked below. You can also change the logic at pin#5 (SEL) via the DIP switch as well as pin#6 (NRL) When SEL is connected to ground via the DIP switch, the voice effects are varied through an on board variable resistor (POT2). When NRL is connected to ground via the DIP switch, the amplifying voice effect is selected. If left open (floating) the transposing voice effect is selected. It really is just a matter of playing around with these options. It doesn't take long for you to get used to it.
If you have any questions, please do not hesitate to ask. You have a lot of information below that you can review before you buy. Thanks for checking out this listing! Make sure to check out our store! We have tons of cool stuff!
DOCUMENTATION:
Schematic Diagram: www.electroniclessons.com/voicechangerschematic.pdf
PCB Diagram: http://www.electroniclessons.com/VoicechangerPCB.pdf
RTS0072B Data Sheet: http://masterkit.ru/zip/RTS0072.pdf
Parts List:
Passive Components:
R1 = 3.3k
R2 = 120R
R3 = 1k
R4 = 10R
R5 = 15k
R6 = 75R
R7 = 1k
R8 = 2.7k
R9 = 27k
R10 = 0R
POT1 = 1k
POT2 = 10k
C1 = 220uF
C2 = 220uF
C3 = 47pf (47)
C4 = 10pf (10)
C5 = 0.1uf (104)
C6 = 220uf
C7 = 0.1uf (104)
C8 = 33nf (33)
C9 = 220uF
C10 = 33np (33)
C12 = 0.1uf (104)
C13 = 0.1uf (104)
C14 = 10uF
D1 = Red LED (3mm)
D2 = 1N4007
D7 = 1N4007
Chips and Sockets:
U1 = LM386 Audio Amplifier
U2 = RTS0072B Voice Changer IC
U3 = LM317LD
DIP1 = 8-pin DIP Switch
Others:
MIC = Microphone
S1 = External microphone input jack
J1 = Robot voice Selection Jumper
J2 = Header output for Speaker Plug-in
CON1 = Optional Power Plug
DC-JACK = 5mm Power Input Jack
POWER-SWITCH = On/Off Switch